
When creating a full-fledged application, for example, a crm system, an online store with a personal user account, or any other version of the site where user authorization is present, many developers face problems in the approach to solving the authorization problem, the system architecture, the use of technologies, etc. Today, in our article, we will analyze an example of one of the most convenient and fast options for creating such functionality using React, Redux toolkit and React Router Dom technologies. It should be noted that the interaction with the backend (albeit minimal) will be taken into account in the following article, so it is important to understand that axios and the add-on in the redux toolkit - createAsyncThunk() will be used for this.
- Creating a React application
- Adding Redux toolkit
- Adding the React Router Dom library and creating wrappers
- Configure AuthSlice
- Configure MainLayout
The main idea is to divide all the logic of the application into two wrappers, one of them AuthLayout - is responsible for all the pages that your application contains BEFORE the user is authorized (Registration, Authorization, Reset password, invites), the other wrapper, MainLayout - display functionality for an authorized user. One of the advantages of this approach is that with the help of redux toolkit, you can check whether the user is authorized even after reloading the page, because the answer about this will come from the backend. Therefore, developers should not store any variables in the browser api (session or local storage)
Creating a React application
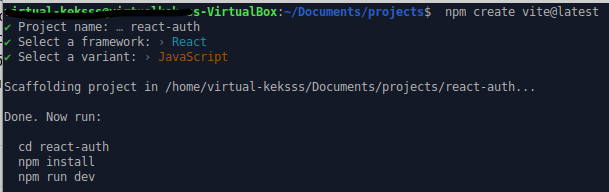
In order to create a React application, you should go to the folder that will contain your project in the future, and write the command npm create vite@latest select the name of the project with which the application is written and then follow the instructions (see screenshot) and initialize the project.
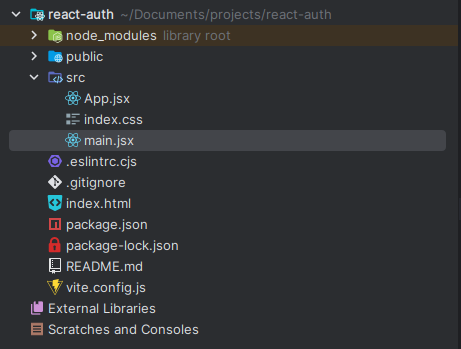
After that, you can clean the code that is unnecessary for us, and as a result, you will have a directory with files like this.
Adding Redux toolkit
First you should add the redux toolkit library using npm install @reduxjs/toolkit
After that, you should create a separate folder called redux along the path ```name-your-project/src/'' and add the slices folder and the store.js file to it. After that, in the slices folder, you should add a slice that will be responsible for authorization between our wrappers (AuthLayout and MainLayout) called AuthSlice, in which to initialize initialValues and two extra reducers, one of which will make a request to the backend checking whether the user is authorized, and the other will make a logout . The whole slice looks like this. It will look like this:

It should be noted that we immediately set loadedLayout to true, because this will check whether the request goes to the backend, and since we will immediately check this, we can safely set it to true so that there are no unnecessary rerenderings and future problems.
import {createAsyncThunk, createSlice} from '@reduxjs/toolkit';
import API from '../../helpers/api';
import {setFormErrors} from './formErrorsSlice';

const initialState = {
    authLoading: false,
    error: '',
    isAuth: false,
    userInfo: '',
    loadedLayout: true,
};

export const logOut = createAsyncThunk(
    'auth/logOut',
    async (pathname, {dispatch, rejectWithValue, getState}) => {
        try {
            const response = await API.POST({pathname});
            return response.data;
        } catch (error) {
            const data = error?.response?.data;
            return rejectWithValue(data);
        }
    }
);

export const getUserData = createAsyncThunk(
    'auth/getUserData',
    async (pathname, {rejectWithValue}) => {
        try {
            const response = await API.GET(pathname);
            return response.data;
        } catch (error) {
            const data = error?.response?.data;
            return rejectWithValue(data);
        }
    }
);

const pendingData = state => {
    state.authLoading = true;
};

const errorData = (state, action) => {
    state.authLoading = false;
    state.error = action.error.message;
};

export const authSlice = createSlice({
    name: 'auth',
    initialState,
    reducers:{    },
    extraReducers: {

        [logOut.pending]: state => pendingData(state),
        [logOut.rejected]: (state, action) => errorData(state, action),
        [logOut.fulfilled]: state => {
            state.authLoading = false;
            state.isAuth = false;
            state.userInfo = null;
            state.error = null;
        },
        [getUserData.pending]: state => {
            state.loadedLayout = true;
        },
        [getUserData.rejected]: state => {
            state.isAuth = false;
            state.loadedLayout = false;
        },
        [getUserData.fulfilled]: (state, {payload}) => {
            state.isAuth = true;
            state.userInfo = payload;
            state.loadedLayout = false;
            state.error = null;
        },
    },
});

export default authSlice.reducer;
After configuring the slice, you need to add the reducer in the store.js file as follows:
import {configureStore} from '@reduxjs/toolkit';
import authReducer from './slices/authSlice';

export const store = configureStore({
    reducer: {
        auth: authReducer,
    },
});
The last thing left is to add a wrapper to our application to be able to interact with our global state, namely the <Provider store={store}/> component where store is the imported store from the store.js file. The final result of the App.jsx component looks like this:
import React from 'react'
import {store} from "./redux/store.js";

export default function App() {

  return (
      <Provider store={store}>
        Something
      </Provider>
  )
}
Adding the React Router Dom library and creating wrappers
For the future navigation of the site, we should add the ability to navigate between pages using the React Router Dom library, we need to add two wrappers, one of which is responsible for the authorized user, the other for the unauthorized one. This can be done as follows, using the createBrowserRouter function, a router is created in which the developer can write the required urls for the required pages. In our case, our router will look like this:
import React from 'react'
import {store} from "./redux/store.js";
import MainLayout from "./layouts/MainLayout.jsx";
import AuthLayout from "./layouts/AuthLayout.jsx";
import Dashboard from "./Dashboard.jsx";
import Login from "./Login.jsx";

export default function App() {
  const router = createBrowserRouter([
    {
      path: '/',
      element: <MainLayout />,
      children: [
        {path: '', element: <Dashboard />},
      ],
    },
    {
      path: '/',
      element: <AuthLayout />,
      children: [
        {path: 'login/', element: <Login />},
      ],
    },
  ]);

  return (
    <Provider store={store}>
      <RouterProvider router={router} />
    </Provider>
  )
}
We created two wrappers, and for each of them we prescribed a login page for unauthorized users and a Dashboard for authorized users. Our next step is to configure both wrappers.
Configure AuthLayout
AuthSlice will be responsible for the number of pages that are responsible for an unauthorized user: registration, authorization, etc. there is no particularly complex functionality here. If necessary, you can export here the repeated code that is collected on all pages for an unauthorized user.
Configure MainLayout
After the authorized user logs out, he should be redirected to the Login page, which is inside the AuthSlice wrapper. That is, the isAuth variable from AuthSlice will be responsible for this, which will change depending on whether the user data comes from the backend. The main solution to the problem was that, as you can see, at the beginning of the article, we set the loadedLayout variable to true so that the user cannot see the Dashboard screen if he is not authorized
import React from 'react';
import {useDispatch, useSelector} from 'react-redux';
import {Navigate, Outlet} from 'react-router-dom';
import {getUserData} from '../redux/slices/authSlice';
import useLegacyEffect from '../hooks';

export default function MainLayout() {
    const {isAuth, loadedLayout} = useSelector(state => state.auth);
    const dispatch = useDispatch();

    useLegacyEffect(() => {
        dispatch(getUserData('/auth/user/'));
    }, []);

    if (loadedLayout) return null;

    return !isAuth ? <Navigate to="/login/" /> : <Outlet />;
}
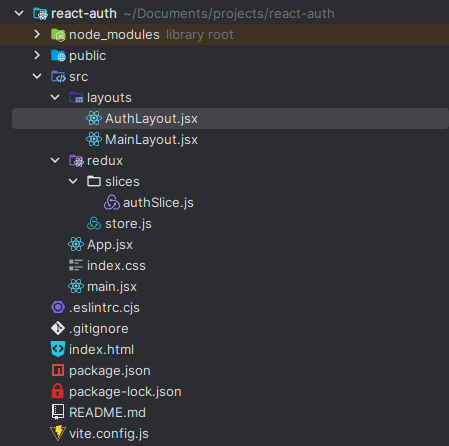
The final version of our file folder looks like this:
Summing up, let's distinguish 3 cases when our functionality works:
An unauthorized user opens a page that is accessible only to authorized users: when the page is opened, a request is sent to the backend, which checks whether the user is authorized. Since the user is not authorized, the site redirects the user to the login page.
An authorized user opens a page that is available to authorized users: When the page is opened, a request is sent to the backend in the same way as in the previous example, which checks whether the user is authorized. But since the user is authorized, the site opens the page he needs
This approach helps to avoid "blinking" of the site: Usually, in all manuals it is advised to initialize the loading variable with the value false. If we did the same, and considered the first option when an unauthorized user opens a page that is available only to authorized users, then we would have the following page rendering chain Dashboard --> Loading --> Login. Instead, we use an approach where the loading variable is immediately true. Therefore, we have the following page rendering chain: Loading --> Login.
Simple authorization process: The advantage of this approach is also that the user authorization process takes place in a simple way, namely: after the status 200 from the server, we will receive data from the backend about the user, and in our redux state we change one isAuth variable to true. After that, the user is redirected to the site's main page (in our case, Dashboard). Therefore, such functionality is very convenient and simple, because it performs all the basic necessary functions for checking user authorization.
This article shows the easiest and fastest way how you can configure routing for authorized and unauthorized users, and depending on this, direct to the desired pages through wrappers.
